
Greetings Hombres*
Today I would like to share with you how I have been making my RF PCBs lately. In my previous blog posts I documented several different methods of making PCBs but Scribble Style is so incredibly quick and effective that I can't imagine ever going back.

While browsing around the hardware section at the new Menards store that opened up in my town, I found a cheap $5 tool called a Scribe. It is a small metal hand tool with a very sharp carbide tip. I thought that it would come in handy on the bench but never imagined it would work so incredibly well for making PCBs. The carbide tip is replaceable for if it dulls but I have used it hundreds of times on many dozen boards and have never had to replace it or sharpen it.
"Scribble Style" is quick and easy. It doesn't take much force at all to remove copper of various thicknesses off of the board. You don't have to fuss with superglue or dremel tools. No more breathing in fiberglass dust or staining your clothes with ferric chloride. You simply scratch the board and you have your layout! A single pass on the PCB is sufficient to create a pad or track that is isolated from the ground plane. If you are doing vhf or uhf work, it is very easy to simply use a ruler and an indelible ink marker to make your layout for 50-ohm microstrip lines and then scribble the copper right off.
My dear XYL came up with the term "Scribble Style" as it involves using a Scribe and I just scribble the layout onto the copper clad as I go along from stage to stage. Of course you can plan out a beautiful perfect layout before hand with this technique too - the beauty is that the Scribe, a $5 tool, does a better job than any other tool I've made or technique I've tried. It pairs well with ugly style too.
I have taken some photographs to help illustrate the technique. I hope that you get your hands on a scribe and try making your next homebrew project this way.
Here is the magic wand that does it all. A $5 Scribe. This isn't the exact one I have but it looks quite similar. If you don't have a Menards near your QTH, you should be able to purchase one from Amazon or Ebay. Spend the $5, get a scribe and start scribbl'in today!

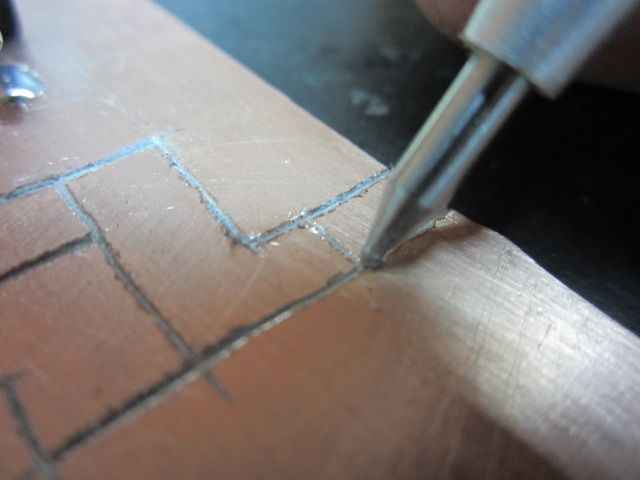
It only takes a few seconds to make each track or pad.


It is truly the quickest and easiest way to make a circuit board that I've ever tried.

A few more Scribbles later & it's done.
I had to make several changes to the above circuit but it was very easy to do. This method lends itself well to experimentation and rapid prototyping. The above circuit is a 100-kHz Frequency Standard/Marker. I tried several different designs from the books but ended up designing my own from "scratch". ;)
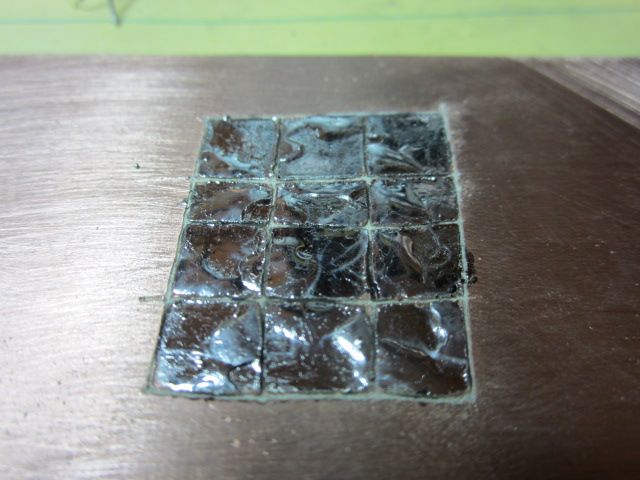
Here is a Scribble Square. It took all but 10 seconds to make. Why etch? Why Dremel? Why Glue? Just Scribble scratch and solder! Et Voila! You're Done! :)


The following is the 100-kHz oscillator I ended up designing from Scratch. It's just a Colpitts oscillator. I added an amplifier and some germanium diodes to generate harmonics last night but didn't snag any pictures of the additions. The feedback caps are 3.3nF.


After making your Scribble scratch, sand (or use another method) to clean up the copper debris.
If
you do get a short, it's likely not because it didn't scratch deep
enough but rather the culprit is usually a small flake of copper debris
bridging the scratch.

Notice the debris left around the edges of the scratch.

Give it a nice gentle sanding to clean it up.

Now that's better!
The following three images may best illustrate how very simple it is to do this.


Well, there you have it, friends. I'm sure that I'm not the first one to use a scribe for making PCB's but I am glad to finally have made a post to share it with all of you. It really is so much simpler and cheaper than any of the other methods I've tried.
Please let me know in the comments below if you give it a try or if you have already been doing this for years. I'de love to hear from anyone who tries this or makes any adaptations to the method. The more we share the more we grow as a community.

Now get to building something and have a wonderful time doing so!
73 - KE0BFF
* - Hombre = HOMeBREwer.